YO1p in 1/35 scale
Postat: fre 06 nov 2009, 17:57
Following on from all the very useful information provided in the thread http://www.smalsparigt.org/cgi-bin/phpB ... 3809#p3809 work has finally started on the YO1p project.
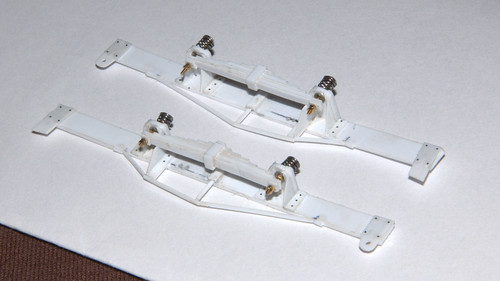
Unfortunately at this time it is nothing more glamorous than a set of cosmetic A end bogie sideframes, however there is still some work required to get the frames into a completed state. To start off with, a good general tidy up of the plasticard is required to remove any residue of liquid poly adhesive, cutting flash and filler, and a general "square up". I have also made the assumption that the bogies are mirror images of each others, as I could not find any other information which contradicted this.
A not particularly exciting picture of them in build is attached below...

The bogies currently lack any relief or rivet detail and a number of experiments were trailed with various sized pin heads to replicate this, however the results were not satisfactory. Therefore I have ordered some "Rivet Transfers" from Archer Transfers in the United States [link]http://www.archertransfers.com/AR88001.html[/link]. These are effectively waterslide transfers but instead of the usual printed decal on carrier film, they are a type of polymer dropped onto the film to provide the detail. Upon the arrival these will be positioned on to the various locations on the side frames for the rivet detail.
I am not happy with the upper suspension springs, which for the time being are HO Sergent buckeye coupler springs. These to my eye are not substantial enough and do not represent the prototype. I have managed to source some alternatives however they are too long and being springs, they are hardened steel and thus very difficult to cut accurately. In the meantime I will continue to look and see if I can find any other alternatives, otherwise I will have to "try" and accurately cut the springs. Replacement of the springs is an easy job with the side frame having the ability to be disassembled.
Once again, apologies for this post in English, I though as a thank you to the help you provided I thought you would like to see progress with this project and thanks again for all your help thus far.
Unfortunately at this time it is nothing more glamorous than a set of cosmetic A end bogie sideframes, however there is still some work required to get the frames into a completed state. To start off with, a good general tidy up of the plasticard is required to remove any residue of liquid poly adhesive, cutting flash and filler, and a general "square up". I have also made the assumption that the bogies are mirror images of each others, as I could not find any other information which contradicted this.
A not particularly exciting picture of them in build is attached below...
The bogies currently lack any relief or rivet detail and a number of experiments were trailed with various sized pin heads to replicate this, however the results were not satisfactory. Therefore I have ordered some "Rivet Transfers" from Archer Transfers in the United States [link]http://www.archertransfers.com/AR88001.html[/link]. These are effectively waterslide transfers but instead of the usual printed decal on carrier film, they are a type of polymer dropped onto the film to provide the detail. Upon the arrival these will be positioned on to the various locations on the side frames for the rivet detail.
I am not happy with the upper suspension springs, which for the time being are HO Sergent buckeye coupler springs. These to my eye are not substantial enough and do not represent the prototype. I have managed to source some alternatives however they are too long and being springs, they are hardened steel and thus very difficult to cut accurately. In the meantime I will continue to look and see if I can find any other alternatives, otherwise I will have to "try" and accurately cut the springs. Replacement of the springs is an easy job with the side frame having the ability to be disassembled.
Once again, apologies for this post in English, I though as a thank you to the help you provided I thought you would like to see progress with this project and thanks again for all your help thus far.